Join The Dots - How To Create VB.NET AutoCAD® Tools

Been struggling to find time to post on here recently due to exams, work and planning a wedding... with a bit of a lull in between everything, now's a good time to get back in the swing of it!
Join The Dots - what on earth am I talking about?! Its the name I've given to a script I've been planning on writing for a while. It is a relatively simple idea, so I am going to take the opportunity to do a step-by-step walkthrough for writing a new AutoCAD® tool.
Preliminary Design
The first thing, is to have an idea. This sounds obvious, but having a clear idea is very important. Writing code will produce specific and predictable results, so you need to know exactly what you want to achieve.
Join The Dots is going to be a tool that will take a series of points, and will draw a polyline through every point, representing the shortest path (hopefully!).
The first step is to think about the idea. I usually ask myself the question "how would you achieve this manually?"
If you didn't join up the dots in a specific way, you'd no doubt end up with situations like this:

This is in fact the longest path. After thinking about it a bit, I thought that you could start off by finding the shortest distance between any two points. This could form a starting segment for our polyline, and then we could append vertices to the line based on their proximity to the start and end points.
Basically, find the shortest line:

Then, look for the next closest point to one of the endpoints of the line:

Repeat:

And we've found the shortest path. So, we have a plan for how to create the tool - time to do some techie stuff!
Setting Up The Project
In my experience thus far, VBA was a lot simpler for interacting directly with AutoCAD®. With .NET, we need to interact with the document database, which is a tad more complex, and involves a bit more code to achieve the same thing.
Ok, firstly we need to set up our project. I've already created a template for AutoCAD® applications, so I've selected that. Using .NET you will need to set up your project correctly - if you want an easy way to set things up, read through this very short tutorial on setting up a VB.NET template that works with AutoCAD®.
Coding The Design
Step 1 - Create a selection
Once we've set up the project, the first step in our application is to make a selection that we can use later. We want the user to be able to select the points that are to be used in the JoinTheDots command. The code below goes in your main subroutine - if you're not sure how things glue together, don't worry - the full code will be given at the end.
'Setup
Dim ed As Editor = Application.DocumentManager.MdiActiveDocument.Editor

'Declare our filter entries this way
Dim values() As TypedValue = {
New TypedValue(DxfCode.Start, "POINT")
}

'Create the filter using our values
Dim sfilter As New SelectionFilter(values)

'Set the selection options
Dim SelOpts As New PromptSelectionOptions()
SelOpts.MessageForAdding = "Select points to find the shortest path through"
SelOpts.AllowDuplicates = True

'Make the selection
Dim res As PromptSelectionResult = ed.GetSelection(SelOpts, sfilter)

'If the user did something other than make a selection (like pressing ESC), then abort
If Not res.Status = PromptStatus.OK Then Return

'Create a selection set based on the user's selection
Dim ss As Autodesk.AutoCAD®.EditorInput.SelectionSet = res.Value

'Create an array of object IDs from the selection set, so that we can loop through them easily
Dim idarray As ObjectId() = ss.GetObjectIds()
So firstly we're creating the variable ed, which refers to an object known as the Editor. This has many useful functions that we will use later.
Next, we're going to create a filter that we will use to limit what the user can select. After all, we're trying to "Join The Dots", so we only want the user to be able to select AutoCAD® POINTs.
The next step is to ask the user to make a selection - however in order to do that we need to set up some things first. We need to set some PromptSelectionOptions, such as the message we want to display to the user. After these settings have been initialised, we can use the SelOpts variable which contains these settings, and the sfilter variable which contains our filter, to invoke the GetSelection method of our Editor object. This will give the user the opportunity to select any objects on screen, and the result of the user's actions will be stored in the res variable, which contains a PromptSelectionResult object.
We need to be mindful to any possible action that the user might take. For example, the user might press the Escape key. If this happens, we need to know, and do something else. This is where capturing the result in the res variable is useful. We're able to tell using res.Status, what type of input the user gave us. If res.Status is "OK", then we know that the user made a selection as expected. If anything else happened (in other words, if the status is NOT "OK"), then the user did not make a selection as required, and we should exit the subroutine through the Return statement.
Finally, if the user made a selection, we want to convert that into a format that is more useful to us - a selection set. Then, from the selection set, we will retrieve the ObjectIds of the objects that were selected. That way, we are able to retrieve and use the individual entities that were selected at some point later on in our code.
Step 2 - Using Transactions
Developing for AutoCAD® using .NET requires that we wrap any modifications to the document in transactions. To make changes to anything in the drawing we need to start a transaction, make changes to the drawing, add these changes to the transaction, commit the transaction, and then dispose of the transaction. This is perhaps a bit long winded, but is actually inherently has some neat perks. One example is that the AutoCAD® UNDO command will undo the whole transaction rather than individual changes. Another example, is that if there is an error at some point in your code (heaven forbid!!) the whole transaction will be voided, and you're not left with a drawing that has been half messed with, and half the same as before.
But anyway, you need to use a transaction - and here's how it's done:
'Create a link to the active document's database
Dim db As Database = Application.DocumentManager.MdiActiveDocument.Database
'Create a transaction manager object
Dim tm As Autodesk.AutoCAD®.DatabaseServices.TransactionManager = db.TransactionManager
'Start a transaction
Dim myT As Transaction = tm.StartTransaction()

'DO STUFF HERE!

'Commit the transaction
myT.Commit()
'Dispose of our transaction
myT.Dispose()
So the first step is to create the variable db which refers to the database of the active document. Next, we create the variable tm, which refers to db.TransactionManager. Then, its just a case of invoking tm.StartTransaction, and storing the resultant Transaction object in the variable myT. Easy huh?
After "DOING STUFF!", we simply Commit the transaction, then Dispose of it. Changes should then be visible in your drawing (assuming you did make changes!!).
Step 3 - Make Changes To The Drawing
'Create a coord array, the same size as the idarray
Dim points(idarray.GetUpperBound(0)) As DBPoint
'Populate the coord array with point2d objects representing the location of the DBPoint objects
Dim n As Long
For n = 0 To idarray.GetUpperBound(0)
points(n) = tm.GetObject(idarray(n), OpenMode.ForRead, True)
Next

'Find the shortest line formed by two coordinates, create a polyline representing this line, and
'remove the two coordinates from the coords array
Dim pl As Polyline = GetShortestLine(points)

Dim TimeToExit As Boolean = False
Do
TimeToExit = AppendPoint(pl, points)
Loop Until TimeToExit

'Add the polyline to modelspace
AddToModelSpace(db, myT, pl)
If you were thinking it were as simple as the code above - I'm sorry to disappoint you... This code calls a few other functions, so we'll be looking at those seperately, but the abstract idea for "making changes to the drawing" is as follows.
- Firstly, get a list of all the DBPoints. To do this, we'll loop through all the ids in our idarray, and add each DBPoint object to a new array called points().
- Now, find the two points that are closest together, and we will use those two points to create the first segment of our polyline. This is what the GetShortestLine function does.
- Now we want to add the remaining points to the polyline, using the point that is closest to one of the ends of the polyline. We want to repeat this step until there are no points remaining.
- Finally, we need to add the polyline (in the variable pl) to the transaction.
And that's the high level process. Specific tasks like getting the shortest line, and appending a point the the polyline, are useful to separate from the main subroutine. This makes it much more readable - we can see the high level process, without getting confused with the detail.
Step 4 - Get the shortest line
This code isn't as complicated as it looks - honest!
Private Function GetShortestLine(ByRef points() As DBPoint) As Polyline

Dim n As Long
Dim m As Long

'Info that needs to be captured
Dim basePoint As DBPoint
Dim endPoint As DBPoint
Dim shortestDist As Double = 1.0E+300 'A very very big number!

'Loop through every combination of point pairs, and find the pair with the shortest distance
For n = 0 To points.GetUpperBound(0)
For m = n + 1 To points.GetUpperBound(0)

Dim tmpDist As Double
tmpDist = points(n).Position.DistanceTo(points(m).Position)

'If this is the shortest distance so far, update
If tmpDist < shortestDist Then
shortestDist = tmpDist
basePoint = points(n)
endPoint = points(m)
End If

Next
Next

'Add the points forming the shortest distance to a new polyline
Dim pl As Polyline = New Polyline
pl.AddVertexAt(0, basePoint.Position.Convert2d(New Plane), 0, 0, 0)
pl.AddVertexAt(1, endPoint.Position.Convert2d(New Plane), 0, 0, 0)

'remove basePoint and endPoint from the array of points, so that they are not reused
RemovePoint(points, basePoint)
RemovePoint(points, endPoint)

Return pl
End Function
Basically, what this function does is iterates through every point, and measures the distance from that point to every other point. The shortest distance found will be remembered, along with the two points that form the shortest distance. The main mechanism at work here is a combination of two For Next loops. The first For Next loop iterates the value of n between 0 and the upper bound of points array. So if there are 10 points, n will loop between 0 and 9. The second For Next loop iterates the value of m between the value of n + 1, and the upper bound of the points array. So, in the case of n=0, m would loop from 1 to 9. This is so that we only make new comparisons - for example, we wouldn't want to compare points(0) with points(0), as its the same point. So we start the inner loop at n+1. We want the combination of n and m to always be unique, and cover every combination. This is what the pair of For Next loops achieves.
After the For Next loops have completed, we have found the points that create the shortest distance. What we want to do now, is create a polyline based on these two points. What we do, is create a new polyline object, and simply add the vertices to the polyline, at the correct positions, i.e., at 0 for the basePoint, and 1 for the endPoint. This creates a polyline joining up the two points.
Finally, so that in future we do not use these points any more as they are already within our polyline, we want to remove them from the points() array. Here we are using another function to do that.
Step 5 - Remove Item From An Array in VB.NET
There is no native function for removing an item from an array in VB.NET, so we will have to create a function to do this ourselves. It's a fairly simple idea:

So, we loop from 0 to the upper bound of the array, and when we get to the item number we want to remove, we simply overwrite it with the next value in the array, and keep overwriting each subsequent item from this point.
Here's the code:
Private Function RemovePoint(ByRef points() As DBPoint, ByRef remPoint As DBPoint) As Boolean
Dim n As Long
Dim newUpperBound As Long = points.GetUpperBound(0) - 1
Dim pointFound As Boolean
'Iterate through the points array until the removePoint is found, then nudge points down the array
For n = 0 To newUpperBound
If Not pointFound Then
If points(n) Is remPoint Then
pointFound = True
End If
End If
If pointFound Then
points(n) = points(n + 1)
End If
Next
'Set the new size of the array, clipping off the last item of the array
ReDim Preserve points(newUpperBound)

If newUpperBound = -1 Then
Return True
Else
Return False
End If

End Function
The final stage in this code is to simply re-dimension the size of the array, to a length 1 shorter than before, thus clipping out the final value, which is no longer needed as it has been copied to the previous item in the array.
Finally, when the array upper bound has reached -1, there are no more items left in the array. In this situation we will Return a value of TRUE, which we will later use as a trigger to stop looking for more points.
Step 6 - Append points to polyline
The final stage of our changes to the drawing is to append points to our polyline in order of how close they are to the ends of our existing polyline. This works on a similar principle to the other subroutine - looping through the points looking for the nearest point, then adding the point to the polyline. This sub will add a single point to the polyline, and remove that point from the points() array.
Private Function AppendPoint(ByRef pl As Polyline, ByRef points() As DBPoint) As Boolean
Dim startPoint As Point2d = pl.StartPoint.Convert2d(New Plane)
Dim endPoint As Point2d = pl.EndPoint.Convert2d(New Plane)
Dim nearestPoint As String = ""
Dim shortestDist As Double = 1.0E+300 'A very very big number!
Dim remPoint As DBPoint

Dim n As Long
For n = 0 To points.GetUpperBound(0)

Dim targetPoint As Point2d
targetPoint = points(n).Position.Convert2d(New Plane)

Dim tmpDist As Double
tmpDist = startPoint.GetDistanceTo(targetPoint)
If tmpDist < shortestDist Then
shortestDist = tmpDist
nearestPoint = "startpoint"
remPoint = points(n)
End If

tmpDist = endPoint.GetDistanceTo(targetPoint)
If tmpDist < shortestDist Then
shortestDist = tmpDist
nearestPoint = "endpoint"
remPoint = points(n)
End If

Next

Select Case nearestPoint
Case "startpoint"
pl.AddVertexAt(0, remPoint.Position.Convert2d(New Plane), 0, 0, 0)
Case ("endpoint")
pl.AddVertexAt(pl.NumberOfVertices, remPoint.Position.Convert2d(New Plane), 0, 0, 0)
Case Else
Err.Raise(0, , "nearestPoint not set!")
End Select

Return RemovePoint(points, remPoint)

End Function
As noted earlier, RemovePoints will Return a TRUE value when there are no more points left in the array. This TRUE or FALSE signal is again passed back through this function, so that we are able to know if this was the last point added. See the Do - While loop, and the TimeToExit variable, in the code earlier on in this document.
Step 7 - Add the polyline to ModelSpace
The final subroutine is to simply add entities to ModelSpace, ensuring that we correctly add it to the transaction too:
Private Sub AddToModelSpace(ByVal db As Database, ByVal myT As Transaction, ByVal ent As Entity)

'Open the ModelSpace Block Table Record
Dim acBT As BlockTable = db.BlockTableId.GetObject(OpenMode.ForRead)
Dim BTR As BlockTableRecord
BTR = acBT(BlockTableRecord.ModelSpace).GetObject(OpenMode.ForWrite)

'Add the entity to the ModelSpace Block Table Record
BTR.AppendEntity(ent)

'Add the entity to the transaction
myT.AddNewlyCreatedDBObject(ent, True)

End Sub
Compiling The Project
If all has been coded correctly, you should now be able to save, and compile your project to a dll file! You can then use the NETLOAD command to load this dll into AutoCAD®, and invoke the command using whatever command name you specified before your main subroutine.
Source Files
I've included below a zip file containing all the source files for this project - just in case things went awry, you can hopefully find the problem. The command name I've used is JOINTHEDOTS.
Source Code
Also, below I've pasted ALL the source code for the project:
Imports Autodesk.AutoCAD®.DatabaseServices
Imports Autodesk.AutoCAD®.Runtime
Imports Autodesk.AutoCAD®.Geometry
Imports Autodesk.AutoCAD®.ApplicationServices
Imports Autodesk.AutoCAD®.EditorInput
Imports Autodesk.AutoCAD®.Colors

Public Class Class1

<CommandMethod("JoinTheDots")> \_
Public Sub JoinTheDots()
'Setup
Dim ed As Editor = Application.DocumentManager.MdiActiveDocument.Editor

'Declare our filter entries this way
Dim values() As TypedValue = {
New TypedValue(DxfCode.Start, "POINT")
}

'Create the filter using our values
Dim sfilter As New SelectionFilter(values)

'Set the selection options
Dim SelOpts As New PromptSelectionOptions()
SelOpts.MessageForAdding = "Select points to find the shortest path through"
SelOpts.AllowDuplicates = True

'Make the selection
Dim res As PromptSelectionResult = ed.GetSelection(SelOpts, sfilter)

'If the user did something other than make a selection (like pressing ESC), then abort
If Not res.Status = PromptStatus.OK Then Return

'Create a selection set based on the user's selection
Dim ss As Autodesk.AutoCAD®.EditorInput.SelectionSet = res.Value

'Create an array of object IDs from the selection set, so that we can loop through them easily
Dim idarray As ObjectId() = ss.GetObjectIds()

'Create a link to the active document's database
Dim db As Database = Application.DocumentManager.MdiActiveDocument.Database
'Create a transaction manager object
Dim tm As Autodesk.AutoCAD®.DatabaseServices.TransactionManager = db.TransactionManager
'Start a transaction
Dim myT As Transaction = tm.StartTransaction()

'Create a coord array, the same size as the idarray
Dim points(idarray.GetUpperBound(0)) As DBPoint
'Populate the coord array with point2d objects representing the location of the DBPoint objects
Dim n As Long
For n = 0 To idarray.GetUpperBound(0)
points(n) = tm.GetObject(idarray(n), OpenMode.ForRead, True)
Next

'Find the shortest line formed by two coordinates, create a polyline representing this line, and
'remove the two coordinates from the coords array
Dim pl As Polyline = GetShortestLine(points)

Dim TimeToExit As Boolean = False
Do
TimeToExit = AppendPoint(pl, points)
Loop Until TimeToExit

'Add the polyline to modelspace
AddToModelSpace(db, myT, pl)

'Commit the transaction
myT.Commit()
'Dispose of our transaction
myT.Dispose()

End Sub

Private Function AppendPoint(ByRef pl As Polyline, ByRef points() As DBPoint) As Boolean
Dim startPoint As Point2d = pl.StartPoint.Convert2d(New Plane)
Dim endPoint As Point2d = pl.EndPoint.Convert2d(New Plane)
Dim nearestPoint As String = ""
Dim shortestDist As Double = 1.0E+300 'A very very big number!
Dim remPoint As DBPoint

Dim n As Long
For n = 0 To points.GetUpperBound(0)

Dim targetPoint As Point2d
targetPoint = points(n).Position.Convert2d(New Plane)

Dim tmpDist As Double
tmpDist = startPoint.GetDistanceTo(targetPoint)
If tmpDist < shortestDist Then
shortestDist = tmpDist
nearestPoint = "startpoint"
remPoint = points(n)
End If

tmpDist = endPoint.GetDistanceTo(targetPoint)
If tmpDist < shortestDist Then
shortestDist = tmpDist
nearestPoint = "endpoint"
remPoint = points(n)
End If

Next

Select Case nearestPoint
Case "startpoint"
pl.AddVertexAt(0, remPoint.Position.Convert2d(New Plane), 0, 0, 0)
Case ("endpoint")
pl.AddVertexAt(pl.NumberOfVertices, remPoint.Position.Convert2d(New Plane), 0, 0, 0)
Case Else
Err.Raise(0, , "nearestPoint not set!")
End Select

Return RemovePoint(points, remPoint)

End Function

Private Function GetShortestLine(ByRef points() As DBPoint) As Polyline

Dim n As Long
Dim m As Long

'Info that needs to be captured
Dim basePoint As DBPoint
Dim endPoint As DBPoint
Dim shortestDist As Double = 1.0E+300 'A very very big number!

'Loop through every combination of point pairs, and find the pair with the shortest distance
For n = 0 To points.GetUpperBound(0)
For m = n + 1 To points.GetUpperBound(0)

Dim tmpDist As Double
tmpDist = points(n).Position.DistanceTo(points(m).Position)

'If this is the shortest distance so far, update
If tmpDist < shortestDist Then
shortestDist = tmpDist
basePoint = points(n)
endPoint = points(m)
End If

Next
Next

'Add the points forming the shortest distance to a new polyline
Dim pl As Polyline = New Polyline
pl.AddVertexAt(0, basePoint.Position.Convert2d(New Plane), 0, 0, 0)
pl.AddVertexAt(1, endPoint.Position.Convert2d(New Plane), 0, 0, 0)

'remove basePoint and endPoint from the array of points, so that they are not reused
RemovePoint(points, basePoint)
RemovePoint(points, endPoint)

Return pl
End Function

Private Function RemovePoint(ByRef points() As DBPoint, ByRef remPoint As DBPoint) As Boolean
Dim n As Long
Dim newUpperBound As Long = points.GetUpperBound(0) - 1
Dim pointFound As Boolean
'Iterate through the points array until the removePoint is found, then nudge points down the array
For n = 0 To newUpperBound
If Not pointFound Then
If points(n) Is remPoint Then
pointFound = True
End If
End If
If pointFound Then
points(n) = points(n + 1)
End If
Next
'Set the new size of the array, clipping off the last item of the array
ReDim Preserve points(newUpperBound)

If newUpperBound = -1 Then
Return True
Else
Return False
End If

End Function

Private Sub AddToModelSpace(ByVal db As Database, ByVal myT As Transaction, ByVal ent As Entity)

'Open the ModelSpace Block Table Record
Dim acBT As BlockTable = db.BlockTableId.GetObject(OpenMode.ForRead)
Dim BTR As BlockTableRecord
BTR = acBT(BlockTableRecord.ModelSpace).GetObject(OpenMode.ForWrite)

'Add the entity to the ModelSpace Block Table Record
BTR.AppendEntity(ent)

'Add the entity to the transaction
myT.AddNewlyCreatedDBObject(ent, True)

End Sub

End Class
I hope this tutorial helped you get started with VB.NET in AutoCAD® - you'll be developing your own tools in no time.
Also, don't be disheartened if you find it difficult to get things going - its a learning curve, and you will get there. If you think I wrote all this code perfect first time, THINK AGAIN!!! It's a process of trying things out, experimenting, and persisting.
Please subscribe to my blog if you found this helpful - my primary concern is giving great tips, tricks and tutorials. There is a lot more to come!
Regards,
Will
P.s. Seriously, subscribe!
Comments
Anton
2011-04-19 12:48:02
Thanks for your code examples! It's very easy to alter this code in other useful tools like creating profiles through a serie of single points which were measured by a surveyor.
There can't be enough samples of AutoCAD® programming on the internet so keep going! :-)
boutaiba
2011-04-19 14:06:28
bien
Mike Wohletz
2011-05-04 13:08:52
Will One thing I have noticed in all your code is that you commit your transaction and then dispose it. This is not something that needs to happen as it is either commit or dispose, I will say that I almost never Dispose a transaction because it is said that it is cheaper to commit it then to get rid of it. Other than that it is looking good, I have posted below a sample of how to do transactions with the "Using" method.
Public Function GetBrefIDsInCurrentLayout(ByVal BlockName As String) As ObjectIdCollection
    Dim OIDCollection As New ObjectIdCollection
    Using TR As Transaction = HostApplicationServices.WorkingDatabase.TransactionManager.StartTransaction
        Dim acBT As BlockTable = HostApplicationServices.WorkingDatabase.BlockTableId.GetObject(OpenMode.ForRead)
        Dim acBTR As BlockTableRecord = TryCast(HostApplicationServices.WorkingDatabase.CurrentSpaceId.GetObject(OpenMode.ForRead), BlockTableRecord) 'HostApplicationServices.WorkingDatabase.CurrentSpaceId.GetObject(OpenMode.ForRead)
        For Each oID As ObjectId In acBTR
            Dim acEnt As Entity = oID.GetObject(OpenMode.ForRead)
            If TypeOf acEnt Is BlockReference Then
                Dim acBlockRef As BlockReference = oID.GetObject(OpenMode.ForRead)
                If acBlockRef.Name.ToUpper = BlockName.ToUpper Then
                    OIDCollection.Add(oID)
                End If
            End If
        Next

    End Using
    Return OIDCollection
End Function
Will
2011-05-04 18:56:44
Thanks Mike - appreciate your help!
Ahmed
2011-05-15 20:11:54
Dear Will,
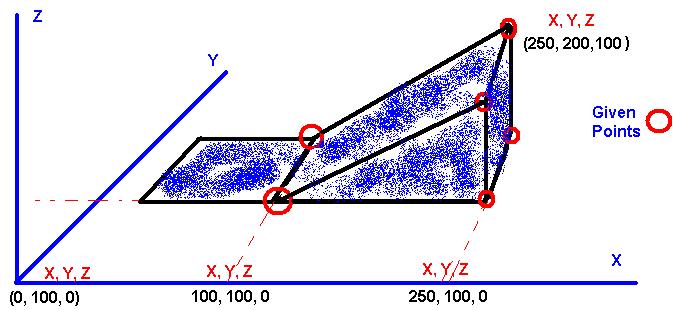
Thanks for your helpful codes and full description. I am planing to create a project to help airplanes landing and taking off, so want to draw a runway but in 3D shape knowing the (x,y,z) for the 6 base points.
The given 6 points can be seen as 3 points for each side of the final shape, if we assume that the required final shape is 2 triangles from both sides left, right connected with each other by 2 lines up,down.
as a final result i heard that it can called a surface or a 3D shape surface -I'm not sure- .
so please if you could give me a sample code to demonstrate that.
Thanks very much for your help
Will
2011-05-16 07:18:19
Hi,
For the benefit of other readers, an image of this is provided below:
I believe one way of achieving this shape would be through the wedge entity, which is basically a solid. Programmatically this is very simple to use too, using the code below:
Sub CreateWedge()
Dim cPoint(2) As Double
Dim wedge As Acad3DSolid
cPoint(0) = 100
cPoint(1) = 200
cPoint(2) = 30
Set wedge = ThisDrawing.ModelSpace.AddWedge(cPoint, 80, 40, 20)
End Sub
This is using VBA sadly, but you can achieve the same thing from .NET using COM. This hopefully will point you in the right direction.
aiswarya tm
2012-02-17 07:39:39
program to display n natural numbers in ascending order in vb.net
paris alshaif
2016-12-02 13:46:04
HEY! I really enjoy your blog with the different codes of vb.net for autocad. I really need your help for a certain task. I can not find it anywhere in the internet and I'm kind of desperate. Please email me or text me so I can discuss this with you in detail. my number is REDACTED. it's really important I talk to you. THANKS!