AutoCAD®, VB and Mathematics

If you want to become an expert AutoCAD® script writer, at some point you're going to need to know a bit about maths, or at least have the capacity to learn. It doesn't have to calculus, but stuff like Pythagoras theorem and trigonometry are very much your friend in a geometric environment such as AutoCAD®. Cringing yet? Don't worry - often it's not as difficult as it seems.
I've been asked how to replicate the measure command along an arc - there is no real simple answer (that I can think of). The way I would do it is through actually calculating the points in 2D space. This may sound tricky, but languages such as VB really are conducive to this kind of work, and you may be surprised how simple this actually is.
So for the purposes of this post I will be showing you how to calculate and draw a circle of points using VBA. Obviously an arc is merely just part of a circle, so isn't really any different. Although we're using VBA for convenience, the rationale behind the exercise will work in any programming language.
Step One - Get it clear in our minds
Logically, to define a circle in 2D space, you need to know the centre for the circle, and the radius. It's no coincidence then that this is exactly what is required by the CIRCLE command in AutoCAD®.
To define a point on the circumference of that circle then - if you have defined your circle, all you need is an angle. From that angle, we can logically derive the point on the circle at that angle. So in our minds at least, we know how to define a point on the circumference of a circle using a centre for the circle, a radius, and an angle.
Now we have to convert that logic into code.
Step Two - Understand Sine and Cosine
One of the key things that will be at work here will be the use of the trigonometric functions sine and cosine. I think it is worth delving into what these actually mean, as understanding this can be very helpful for this kind of work. In fact, when I was at school I was taught parrot-fashion how to use SOH-CAH-TOA to work out which trig function to use for which situation. I've never been a fan of that kind of "learning". I like to understand the underlying principles so that I can apply them to any situation, but sadly I was never taught in that way. My own curiosity led me to figuring out the diagram below for myself, and it really enhanced my ability to understand trigonometry, and what sine and cosine actually are.
Consider the image below:
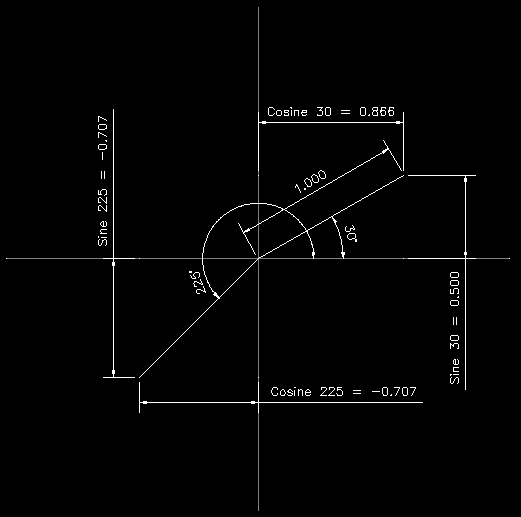
Assuming a hypotenuse (the angled lines coming from the centre) length of 1, sine is the length of the deflection in the Y axis for a given angle. So in the example above, a line drawn at 30° a length of 1, will produce a deflection in the Y axis of 0.5. Sine 30 = 0.5. It's as simple as that.
Cosine is equally as simple, but rather than the deflection in the Y axis, it will return the deflection in the X axis. So, Cosine 30 = 0.866.
This is how we are able to determine the length of sides in a triangle from angles through trigonometry. Lets assume the hypotenuse is actually 4. The ratio between the sides is still the same, so the calculation to work out the vertical edge of the triangle (the deflection in the Y axis) is as simple as 4 * Sin 30. We multiply by the length of the hypotenuse to scale the side length to the correct size. Simples.
Step Three - Write the code
I think we're ready for some code. Below is a function that accepts the various inputs we have identified and will draw a point in modelspace.
Sub drawPointOnCirc(xPos As Double, yPos As Double, radius As Double, angle As Double)
Dim insertPoint(2) As Double
Dim xOffset As Double
Dim yOffset As Double
Dim angleRadians As Double
Const PI As Double = 3.14159265358979

'Convert degrees to radians, as required by VBA trig functions
angleRadians = 2 \* PI \* angle / 360

'Calculate the X and Y offset from the centre of the circle
xOffset = Cos(angleRadians) \* radius
yOffset = Sin(angleRadians) \* radius

'Add the circle centre to the offset values, to get the absolute
'position of the point on the circumference of the circle.
insertPoint(0) = xPos + xOffset
insertPoint(1) = yPos + yOffset

ThisDrawing.ModelSpace.AddPoint insertPoint

End Sub
This function is actually really useful to us now. We are able to draw a point in modelspace that represents a location on the circumference of a circle. Now, if we were to call the function in the manner below:
Sub main()
Dim n As Double
For n = 1 To 120
drawPointOnCirc 10, 10, 3, n
Next
End Sub
this would draw 120 points at 1 degree intervals along an arc. The circle centre is defined at 10,10 with a radius of 3, which is what the arc should show.
And that's it!
Hopefully this post has shown you how a little bit of maths can be helpful - the production and reuse of functions like this is really helpful to building up more complex applications... have fun, and as always, feel free to get in touch if you have any problems.
And please subscribe below if you want more tips like this!
Will
Comments
RANJAN
2011-06-12 12:43:56
Hi will,
I want to insert 23 number of blocks(rectangle 3000 x 150) along an arc of radius 308500 mm ; stangle = 270 deg ; endangle = 282;
plz help with this....
Will
2011-06-21 09:18:18
This post gives you the basics for defining the insertion point for your block. The line that reads:
For n = 1 to 120
is where we are looping through the angles we want to define a point for. If you're wanting to insert 23 blocks equally spaced along an arc, you will need to calculate the angular deflection between each point:
The included angle for the whole arc will be calculated by:
incAngle = endangle - stangle
so 282 - 270 = 12. Then you'll need to take 12 and divide this by the number of items you want to fit along the arc:
angularDeflection = incAngle/23
You may wish to add 1 to the value 23 to add a final space at the end of the arc:
angularDeflection = incAngle/(23 + 1)
Then we need to adjust the For loop slightly, to include a step value:
For n = 270 to 282 step angularDeflection
That should resolve the issue of spreading the 23 points equally along an arc.
Hope this helps, Will
Abigail Hesterly
2012-05-16 15:06:07
Thanks for good info :)
Pramod
2012-08-16 06:55:07
Dear WILL, Excellent piece of code with a great explanation! Please understand that you have really helped me with this explanation and code and saved me from my frustration of achieving this !! Actually, my requirement was to to draw lines from the circle center to each points plotted with that loop which i achieved.
Many thanks for sharing this.
Will
2012-08-17 12:20:39
No problem, glad to help :-)
Neelima
2014-07-24 06:50:24
Hi Will,
Please let me know which dll file is to be referenced to import Autodesk.AutoCAD®.Interop in a class library.
Thanks, Neelima
Will
2014-07-28 11:20:28
Hi Neelima,
The page below should contain the information you're after:
Introduction to VB.Net in AutoCAD®Regards, Will