VBA in AutoCAD® - Tutorial 1: Introduction

Introduction
Knowing a little bit of programming can be extremely useful in the AutoCAD® environment. Before you cringe with dread at the prospect of having to learn a programming language, it sounds far more difficult than it really is. Especially since VB stands for "Visual Basic" - there's a clue in the name... Writing simple applications for automating tasks isn't hard - really.
This tutorial assumes no previous knowledge of VBA in AutoCAD® or otherwise. I will explain the very basics of using VBA in AutoCAD®. I will give a brief overview of the VBA IDE (Integrated Development Environment) and I will explain a small snippet of code and how it works.
What is VBA?
If I assume you know nothing about VBA, it follows that you probably don't know what VBA stands for. VBA stands for Visual Basic for Applications. Most people reading this will probably have heard of Visual Basic, and are aware that it is a Microsoft Windows based programming language. The "for Applications" bit means that it is integrated behind the scenes in the software application you're using, be it Word, Excel, or in our case AutoCAD®.
Step One - Familiarise with the IDE
In order to begin, we need to access the VBA IDE. This is where we will be working. Input VBAIDE into the command line. This opens up a new window which is the VBA IDE. You should have something that looks like the below:
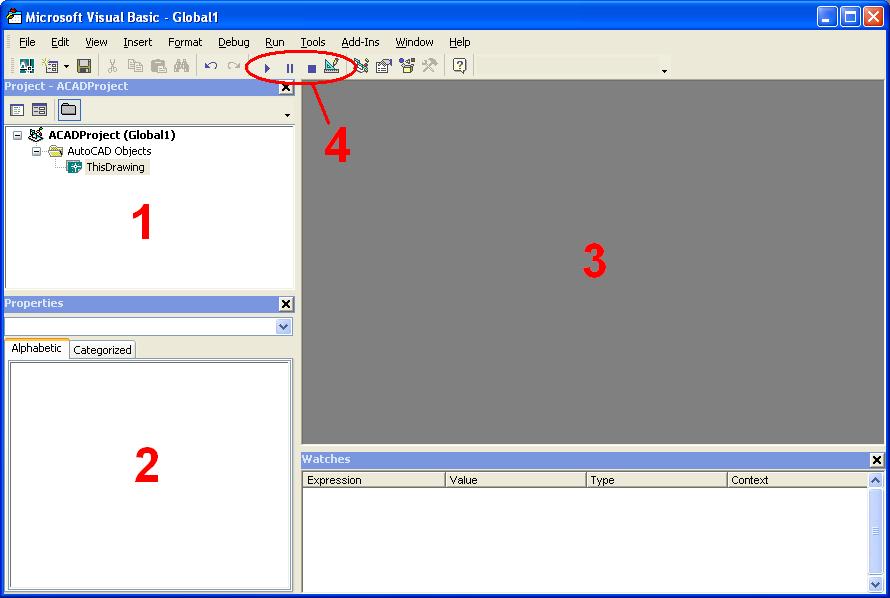
The section of the screen with the big red "1" is the project window. This shows you all the sections of your VBA project. Right click in this area and select insert/module. This will (surprisingly!) insert a module. A module is basically a container for your code. If you like, you can rename the module from "Module1" to something more descriptive of what the module does or is for.
The section of the screen represented by the number 2 is the properties window. Various aspects of your project have certain properties that can be edited. I won't go into this right now.
The section of the screen represented by the number 3 is the editing window. If it's grey at the moment (like in the example), you're not editing anything. If you've added a module, chances are you're looking at a white screen, and you can type stuff. When you add a module, it automatically opens it up in the editing portion of the screen.
The section of the screen represented by the number 4 is a toolbar - in particular the buttons that handle the execution of code. The run button causes VBA to start executing code from the current subroutine (i.e. the subroutine in the module you're editing that contains the cursor). The pause button will pause execution, and take you to the debugging screen. The current position that VBA has got to will be highlighted with yellow. The stop button halts execution.
Step Two - Add some code, and run it
Make sure you're at a state where you are editing a module. You might have at the top of the screen the words "Option Explicit". This is fine, but also don't worry if it's not there. You don't really need to know about this right now. Paste the following code into the module:
Sub QuickExample()
    Dim MyString As String 'Create string variable
    MyString = "Hello! This is the contents of the string variable called MyString" 'set it to something
    MsgBox MyString 'show it in a messagebox
    Dim Point(2) As Double 'This is how to create an array
    Point(0) = 10 'This is x
    Point(1) = 20 'This is y
    Point(2) = 0 'This is z
    Dim TextHeight as double 'Create double precision floating point number variable
    TextHeight = 10 'set textheight to 10
    ThisDrawing.ModelSpace.AddText MyString, Point, TextHeight 'Add text to drawing in modelspace
End Sub
Everything should have pasted in nicely. The text should automatically change into a lovely assortment of black, dark blue, and green colours. If you get any red, then something went wrong when you copy and pasted. When editing code, different colours of text represent different things. Green text represents a comment or note - this text can be anything and is for the purpose of you making your own notes. Dark blue text represents key words that VB understands. Red text indicates anything that contains errors, or the structure of what you've written is wrong. However, just because it's not red, doesn't necessarily mean that it contains no errors. Black is anything that doesn't fall under any of the above.
You probably guessed that to execute the code, you click the run button in the toolbar at the top. The shortcut for this button is the F5 key. As an additional point, it is sometimes useful to know how to execute your code without opening the IDE. To do this, you would type in -VBARUN into the command line, followed by you're subroutine name. This command can conveniently be stored in a toolbar or pallette using the normal process for editing the user interface - CUI. Notice the preceeding "-" in front of the VBARUN command. You probably already know this is an AutoCAD® command modifier. The dash explicitly tells AutoCAD® to expect command line entry. If the dash is omitted, VBARUN opens a little dialog box, and you can pick your subroutine from there.
Step Three - Understanding the code
Maybe you executed the code and thought "that's not very interesting..". If so, I assure you this is the tip of a very large iceberg. In the code above, I've added comments in such a way that it explains it a little, but I'll give a little more detail now.
Code is executed from the top down in the same manner you would read a book, unless you tell VB to do something else.
Dim MyString As String
This is the first line of code. This line creates what is known as a variable. The Keyword "Dim" is the part of the code that tells VB to create a variable. A variable is basically a memory bank with a name. The name of the "memory bank" or variable is MyString. We specified the name MyString, but it could have been called something else if we liked. The line Dim This_is_a_variable as string would be equally valid, but it's a bit of a mouthful. Also, any reference to MyString in the code would need to be changed to This_is_a_variable in order for the code to work in the same way. The part of the code that says "As String" tells VB what type of variable it is. In this case, it is what is known as a String variable, or a Text-String. This basically means that anything that is attempted to be stored into the variable MyString should be interepretted as Text. If it is not text, VB will try to convert it to text. If it cannot, an error will occur with the message "Type Mismatch"
MyString = "Hello! This is text in a string variable!"
This line of code shows you how to set the contents of a variable. It is simply a case of stating that Variable = SOMETHING. The text after the equals sign must be enclosed inside quotation marks. If it was not enclosed in quotation marks, VB would try to execute the text as code, and an error would occur (the text would also be red). So enclosing it in quotation marks tells VB not to interpret this as code, but use it as a text value.
MsgBox MyString
This line of code causes a messagebox to be displayed. The command for doing so is MsgBox. The part following MsgBox in this instance is our variable called MyString, however we didn't have to use a variable here. We could have explicitly put in any text we like enclosed in quotation marks, and it would be executed in the same way, displaying the inside of the quotation marks instead of the contents of the variable.
Dim Point(2) As Double
This should look quite familiar - again we're declaring a variable. You'll notice that it is a different type. In this instance it is a number. Specifically, a double precision floating point number, but we don't need to know the details yet. You might also have noticed the brackets containing the number 2. The name of the variable is still just Point but this time it is an array. Think of an array as a list within that variable. This particular array has 3 elements to that list - 0, 1, and 2. We'll probably talk more about arrays at another time.
Point(0) = 10 'This is x
Point(1) = 20 'This is y
Point(2) = 0 'This is z
Similarly to before, this is assigning values to the variable. However this time, as we're dealing with an array, we need to specify which part of the list we want to assign our value to. Realise that all of the values are actually stored in the same variable, but just organised into a list.
Dim TextHeight As Double
TextHeight = 10
No problems here.
ThisDrawing.ModelSpace.AddText MyString, Point, TextHeight
The final line of code in this subroutine. The first part is quite self explanatory - Thisdrawing.Modelspace.Addtext. This adds some text into the modelspace of the active drawing. If there is no active drawing (i.e, they're all closed) an error will occur. In order for AutoCAD® to be able to add text, it needs to know certain things: What text do you want to display? Where do you want to display it? What size do you want it to be? At this stage I will point out that the text we are adding is NOT MText. It is Text - what you would get by using the Text command in AutoCAD®. Conveniently, we've already set up some variables that contain the values we need. Pop them after Thisdrawing.Modelspace.Addtext in the right order, delimited with a comma, and you've now got some text in the modelspace of the current drawing.
I hope you found this a useful introduction - we haven't don't anything particularly useful yet, but there's much much more great info where this came from. If you liked what you read I would encourage a subscription - you won't regret it!
Comments
Hussien
2010-12-25 14:01:28
Hi there, I like your site, Iam developing a project for the university about a supermarket and I have to draw a stands for a supermarket and point some items in the drawing... Can someone help me ??
aneesh v
2011-10-21 09:28:36
hi , i like your site too,
can you give me some site address that contain vb codes for autocad.
stan
2011-11-24 07:27:44
nice Tutorial for a beginner, thanks a lot
Eduardo Ribeiro
2011-12-21 13:13:32
This site is very good.
I am Brazilian from São Paulo and, unfortunately, there is not much material here for autocad vba ... Thank's!
Will
2011-12-21 13:52:12
Glad you like the site. There's not much support these days for VBA, as most of use have made the jump to VB.NET. I suggest having a look on my site for my tutorials on VB.NET.
Will
Hisham
2012-07-05 12:36:34
Very nice tutorial
Please do more , your way in explaning stuff is great...do u mind if i translated some of your stuff to arabic (my language) and publish them
Thanks again and greetings from Egypt !
Will
2012-08-08 18:39:30
I don't mind at all, as long as you provide me with a link ;-)
WISNU
2013-09-23 10:32:16
Hi, i like your site.
it's give me a lot of knowledge about AutoCAD® VBA.
Thanks for your posting.
Sahan
2013-09-25 09:37:32
Thank you ...appreciate your effort
hannan
2016-02-10 16:45:26
i love it but i wanna some another example so please help me any body